Thursday, April 26, 2018

Project Quilting off season challenge


April Fools – Too cold to fish

When the Project Quilting finished for Season 9 I was sad to say the least.  I really loved trying to put together a quilt of some sort in the week of the challenge.  Then, last season I noticed there was an off season challenge during the last one – so I made a tree skirt because I needed one.

This 1st off season challenge theme was April Fools, and by chance we had the snowiest April in history and I had just purchased a box of fabric online from somebody de-stashing.  The box had 9 yards of fish fabric, I needed to do something with it to get rid of some – besides giving a couple yards to my mother and a couple to my sister.  I decided to make a stack & whack quilt with it.

I lined up my fabric, cut up my strips 4” high, stacked them and cut my triangles out.  I made my half hexis and arranged them into the quilt.  I didn’t feel like making more so when I needed more to make the quilt, I just cut some half hexis out of the fabric itself to use in some places.  After putting the rows together I realized I should have put a half triangle on each end (oops) so I had to appliqué my first border fabric under the hexis on the edge-problem solved.


I added another border to make the quilt a little wider by using some more fish fabric.  It was sandwiched and I quilted along the lines of the hexis and across the center of each row to finish it off.  I also added a ribbon quilting in the first brown border.  Then I added a brown bias binding to the whole quilt.  

Ended up being 50” X 60” quilt with a cotton batting between the layers.  All ready to take to the next craft show.  I think it took me about 8-10 hours to make all together so not too hard.

Until I craft again.


Wednesday, March 21, 2018

Laundry Day - How to make a fabric laundry basket


For the Project Quilting Challenge for this week the theme was "Scraptastic" and I have a lot of scraps to choose from.  For my project I used all scrap fabrics and batting. The binding and interfacing were not scraps, but you could use scrap pieces for those too. Over the years I have collected scraps from different projects: aprons, potholders, table runners, quilts, sun dresses...  You name it I have probably made it.  I've got scraps galore.   I keep them color coordinated and rolled up tightly and held together with a pin so I can find what I am looking for. There are some that are not put in rolls yet in the photo but when I can't get to the rolls without pulling out all the new pieces I will sort through them and put them in the correct roll.  I pulled out the red and black rolls and these are the scraps I started with.

I was trying to think outside of the box for this one, but nothing came to mind.  So instead of just making a quilt or table runner with the scraps, I asked my husband what we could use for the camper that I could make, so the idea of a laundry basket came up.  So with that I went to my sewing kingdom and picked out some red and black and white scraps from my bin. 


To make it a true scrap project I also used leftover canvas fabric for a lining and pieces of cotton batting to give it a little substance when I quilted the fabrics.  

I cut up the pieces in (atleast) 22 inch lengths with varying widths, laid them out in a black/red pattern and stitched them together until I had the correct circumference for the circle. I had about 25 different pieces of fabric for this project.  My length was 67.5" long once I trimmed up the edges.

 I found a calculator online that gave me the correct circle size for the bottom.


When it was all sewed together and trimmed to about 18" I ironed on interfacing to make it a little stiffer so it would stand up on it's own.  I did not have scraps for that job so I had to use what I had on the bolt.  I also stitched together some pieces of a guitar canvas fabric I had left over from a baby shower gift I had made - she was decorating in a rockstar for her son and I made some toy bags out of the canvas.  Her son is 5 now and I had not used that fabric since the shower so it is getting use now, I really didn't want to put any "extra" money into this project.


Next was the fun puzzle part, I grabbed my bag of cotton batting scraps and started laying them out onto the canvas so they could be quilted into my bag.  I overlapped them just a little bit so they would not leave a gap in the batting if it shifted.  After I sandwiched my quilt fabric together and pinned ready to be quilted.


I wanted to try something new for the quilting and I had seen a vine with leaves in it so I figured this would be the perfect piece to try it out on since it was just a laundry basket that I was keeping.  It really came out nice.


I trimmed up the quilted piece and sewed the edges together to make my "tube".  I then added the bottom circle of canvas to the entire piece and stitched that on.  I did stitch an overlock stitch on the edge to keep the fabric from fraying with use.  I put on a piece of black binding around the top and stitched a couple 12" handle pieces out of the guitar fabric and sewed them to the inside of the bag.


Bag complete with 4 days to spare and 38 days to spare before camp opens.  Hope you like my scrappy "Laundry Day" bag.


I still have a wee little bit of the guitar fabric left over so I may be able to squeeze out a sleeping bag pouch for the new dinosaur sleeping bags I purchased for my grandsons.  I'll see if I have enough.  I may make up my own scraptastic sleeping bag pouches for them before camp opens!!!  OOOOOHHHH - I did buy dinosaur fabric for a quilt for my oldest grandson "Dino" Daniel, so I might have to use that and just make him a little pillow cover with the rest.  I guess I have another project to complete!


Until I craft again.

Saturday, March 10, 2018

Double Disappearing 9 Patch - Project Quilting Quilting Challenge season 9

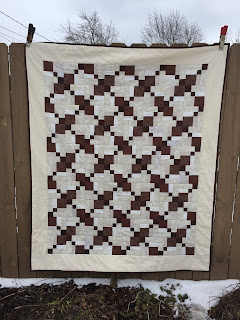
I call this quilt Blood, Sweat & Tears.  It measures 5' by 6' and is a throw for my hubby.


This was a busy week, I took on the challenge from Project Quilting this week with the theme "Stitch in Time" and it is in reference to PQ Season 9.  I love disappearing 9 patch quilts so I decided to make one for my hubby because he always steals all my favorite blankets to sleep under while watching TV.


Busy week yes, besides work, I had bowling on Wednesday, a council meeting to attend on Tuesday, a dinner with the work girls to celebrate a retirement on Thursday, and my son and his two boys over for dinner on Friday.  Can't believe I actually had enough time to finish this one but here it is!!!

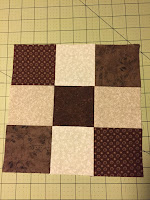
I started on Sunday afternoon picking colors for the quilt from my stash.  Went with browns & tans since his new recliner is dark brown.  I cut out some blocks to test out the pattern first to see how big it was going to be.  I went with 4.5" blocks for the first 9 patch block.  The inspiration was this blue quilt.


After that was sewed, I chopped it in half and added some more blocks for the second round (forgot to take a picture of that)  Then I chopped that one in half and sewed the four blocks back together to make this one that after trimming it down measured 12".  OK, ready to make the rest. 

Here is where the Sweat comes in.  Cutting blocks for a couple hours made my forearm sore, sewing them together without making a mistake, and then chopping them in half was time consuming.  When I cut up the second set of blocks to add to my first chopped blocks is when I made a major mistake - I cut them 1" too big.  I had to recut them down to size and waste 1" of fabric from each block (two sides).  This is probably when I forgot to take the picture of this step - I was so frustrated with myself for not measuring right.  If it wasn't for that I probably would have finished it Saturday morning instead of the afternoon.  After the second set of blocks were finally added to the first set, I chopped them in half and sewed them back together in the pattern I wanted.


Finally ready to put the rows together Friday morning before work, got them together and finished putting the blocks together at lunch time (I am lucky I work so close to home I can eat at home every day).  I had to get some border/backing fabric and matching binding fabric at the store to finish it off.


The Blood came in when I was quilting lines, I pricked the side of my hand with a couple pins while the quilt was being sewed - ouch - not once but multiple times.   Time to get safety pins for that job.


The Tears came this morning before I finished the quilt, when I heard of the death of the son of a former fellow cheerleader coach this morning, my tears were for his surviving family that they can get through this terrible time.

Until I craft again.


Friday, February 23, 2018

Mellow Yellow Project Quilting season 9


Another week of figuring out just what I wanted to make. Actually yellow is my favorite color. My first brand new off the lot car was a 1981 yellow Ford Mustang.   I owned it until 1990 when my second child was born and then I needed a bigger car.

The challenge quilt this week theme was mellow Yellow and it took me really a couple days to throw some ideas around until I decided to make some pieced roses into a wall hanging for my family room. I’ve seen some wonderful quilts with raised parts in them and the leaves would be the perfect things to pop off the quilt for my first time.

The yellow rose symbolizes warmth and friendship. So this bouquet is giving warm wishes to all my family and friends at home, far away, ones I haven’t spoken to in a while, some I only saw a couple times, those I only know through social media, those I haven’t met yet, and to those I will meet again after I leave this world. I will love you all always.


First thing I did was cut out the rose center and continued to add “petals” until the rose was big enough. Then I added background fabric following the same lines as the rose. Once the quilt was big enough, I wacked off a piece so I could add another rose section with background colors. Then I wacked off more pieces and added two more.

The fifth one I had to appliqué on since I couldn’t figure out where to cut the quilt to add it.  It was kinda fun chopping up the quilt in this way but a little scary trying to figure out angles to put it back together.  Some of my seams got a little thick if I had too many in the same place.


I added leaves before stitching the background onto the roses. I added stems of a narrow double fold bias that I made that matched the leaves, and added a few more leaves to the stems.

I also added some stabilizer before I put on the binding, just so it would hang a little square up on the wall.  It was my first real quilt I was going to display on the wall in my house.


I quilted the roses in a spiral pattern and just meandering quilting in the background.  I know on a few  social media groups I’m in that some consider meandering stitching a “simple” stitch but I really like the way it looks. I don’t think it’s simple but I am new at this. Maybe it is... but I like it.

So it's done now, I made it 18"x18" with a 1" yellow border and a small hanging loop in the back that I hand stitched on.  I also put a decorative leaf stitching onto the binding when I stitched it down.  It now graces the wall in our family room above the fireplace.  Hopefully the next challenge will give me some ideas for the rest of the wall (giggle, giggle).

Until I craft again.

PS:  Now that it's on the wall, I think I may have to put another rose in the upper right corner.  It looks a little bare there, or if anybody has any suggestions I'd be glad to consider them!!!